Many of you may have already had a chance to run A/B tests on your campaigns, however if you haven’t, you will find that its a very effective way to maximize your campaign results and learn about your subscribers. Secondly, it ensures that the message the majority of your subscribers receive is the most relevant choice – this is a win for everyone.
What is an A/B Test?
An A/B test involves two differing emails being sent out to a small portion of your subscriber list, with the most successful (‘winner’) email being chosen from the two after a defined period of time. The winner is then sent to the remainder of your subscribers.
You may have heard this practice being described as ’10/10/80 split’ or ‘multivariate’ testing (however the latter involves changing multiple parts of your campaign). Perhaps you have heard reasons why people don’t use it, such as ‘it’s too hard to do’, or, ‘by the time I get the results from the initial test, it will be too late’. The good news is that we’ve set up a very powerful and easy-to-use interface for your to conduct A/B split campaigns. As the results arrive in real-time, you don’t have to wait until the following day to select your winning email; in fact, we’ll send the winner out automatically.
So… Why test?
There are a number of great reasons why you should optimise your campaigns using A/B testing, including:
- The chance to experiment and learn from different subject lines – what will produce the better open rate, ‘Receive 20% off all products at ABC Store’, or ‘Discounts on all products at ABC Store’?
- The opportunity to decide what email content is most relevant and responsive – Is layout A better than B? What call to action will work best?
- Deciding which From name is best – Do you go corporate ‘ABC Gym’, or personal ‘Bill from the gym’?
No matter what you decide to test, A/B testing will always provide you with useful feedback on your campaigns. For example, you will soon find that the process of choosing the ‘perfect’ subject will rapidly become less of a guessing game and more of an empirical study.
Creating an A/B test campaign
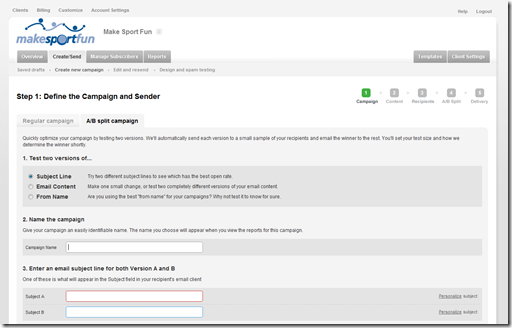
Creating an A/B test campaign is similar to creating a regular campaign – after you click the ‘Create a new campaign’ button, you will see two tabs beneath ‘Step 1: Define the Campaign and Sender’. Click the ‘A/B split campaign tab’ and you will be on your way:
In this example, we’ll be selecting two different subject lines. You will be required to enter differing subject lines for Version A and B of this campaign. You can also personalize the subject line with the recipient’s first name, last name or full name:
Once satisfied, complete ‘Step 2.1: Select the format for this campaign’ as you would on a regular campaign. If you have chosen to send two differing emails, you will be presented with the option to include both of them on this step. Next, you will move onto defining recipients. At ‘Step 3.1 – Select the recipients for this campaign’, select your subscriber list as you would for a regular campaign, then click the ‘Define A/B Split’ button:
In ‘Step 4.1 – Size of test and how you’ll decide the winner’, you can define using the slider what percentage of your subscriber list will receive the initial A/B test emails, then what percentage will receive the winning version. These percentages (A/B/Winner) are entirely up to you, however they cannot be smaller than 1/1/98%, or larger than 25/25/50%. Commonly, 10/10/80% splits are used:

Secondly, you can define what criteria will be used to select the winner. You can select from Open rate, Total unique clicks, or Total clicks on a selected link. This will map back to how you will finally gauge the success of the email campaign, for example, if you are looking to drive visitors to your online store, you may want to select ‘Total unique clicks’ as the criteria for selecting a winner.
Finally, you can select the number of hours or days across which you want to run the A/B test. The default is to ‘Select a winner after 6 hours’, however depending how time-sensitive your campaign is, you may want to select more or less. Note: Setting a testing period of less than a few hours may impact the reliability of the test, as there may be insufficient click and open data generated to accurately determine a winner.
Once you’re done, click ‘Next’.
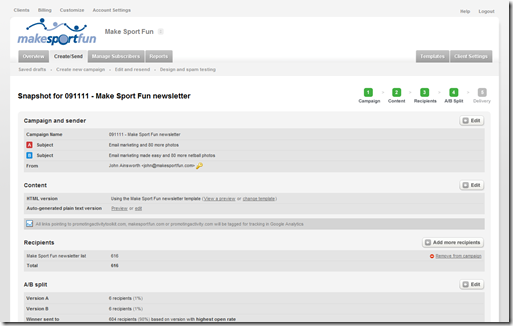
You will then be presented with a snapshot of the email campaign, including the two subject lines defined earlier. Review, then click ‘Test and define delivery’:
In ‘Step 5.1 – Test your campaign’, you will have the opportunity to test your campaign prior to sending it just as you would a regular campaign. Likewise for ‘Step 5.2 – Schedule campaign delivery’. It’s time to get sending!
Sending and monitoring an A/B test campaign
The excitement all happens once you’ve sent out your email campaign – and at this point, you will see the real-time presentation of results to be quite different from that of regular email campaign sends:
Not only will you be able to see how each version of your creative is performing in the test, but upon completion, you will be able to view the total benefit gained from running the test. This is an excellent way to admire your own handiwork, as well as learn how differing approaches to subject line, content and the from line can alter the results of an email campaign.


